LOADING IMAGES
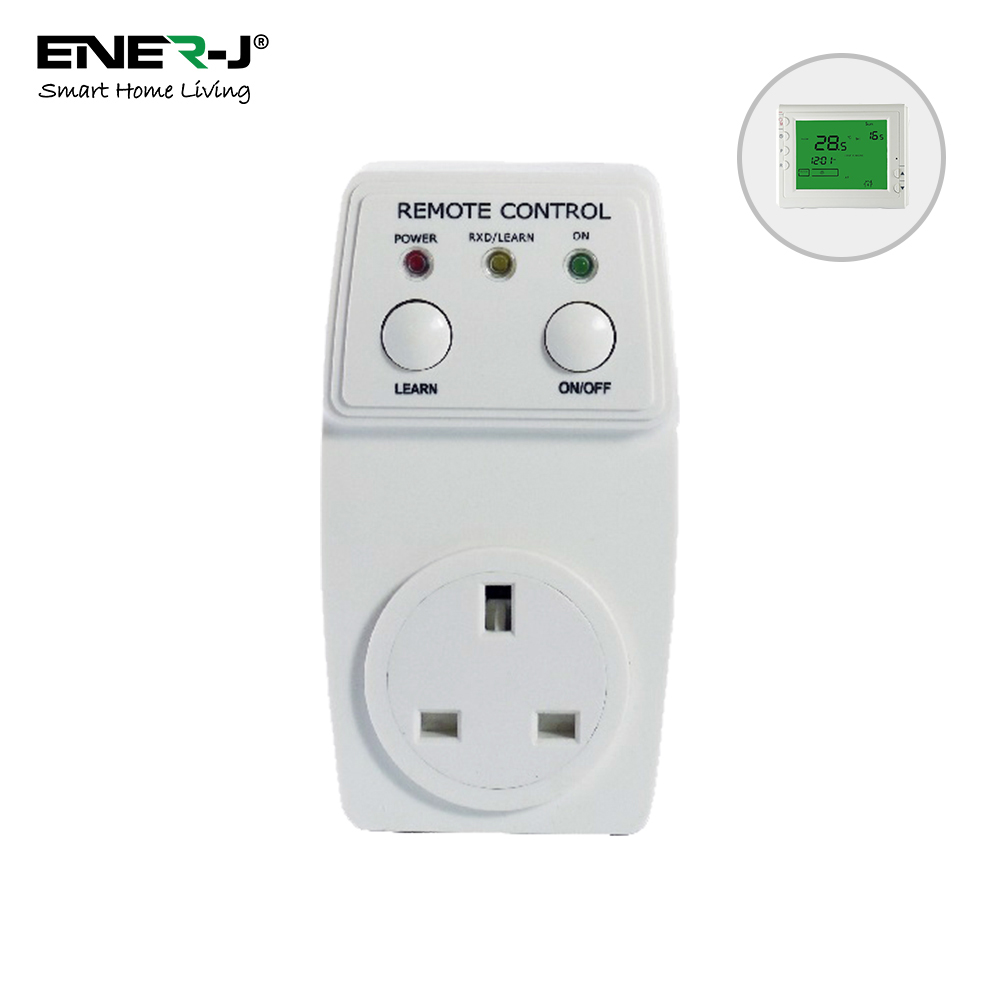
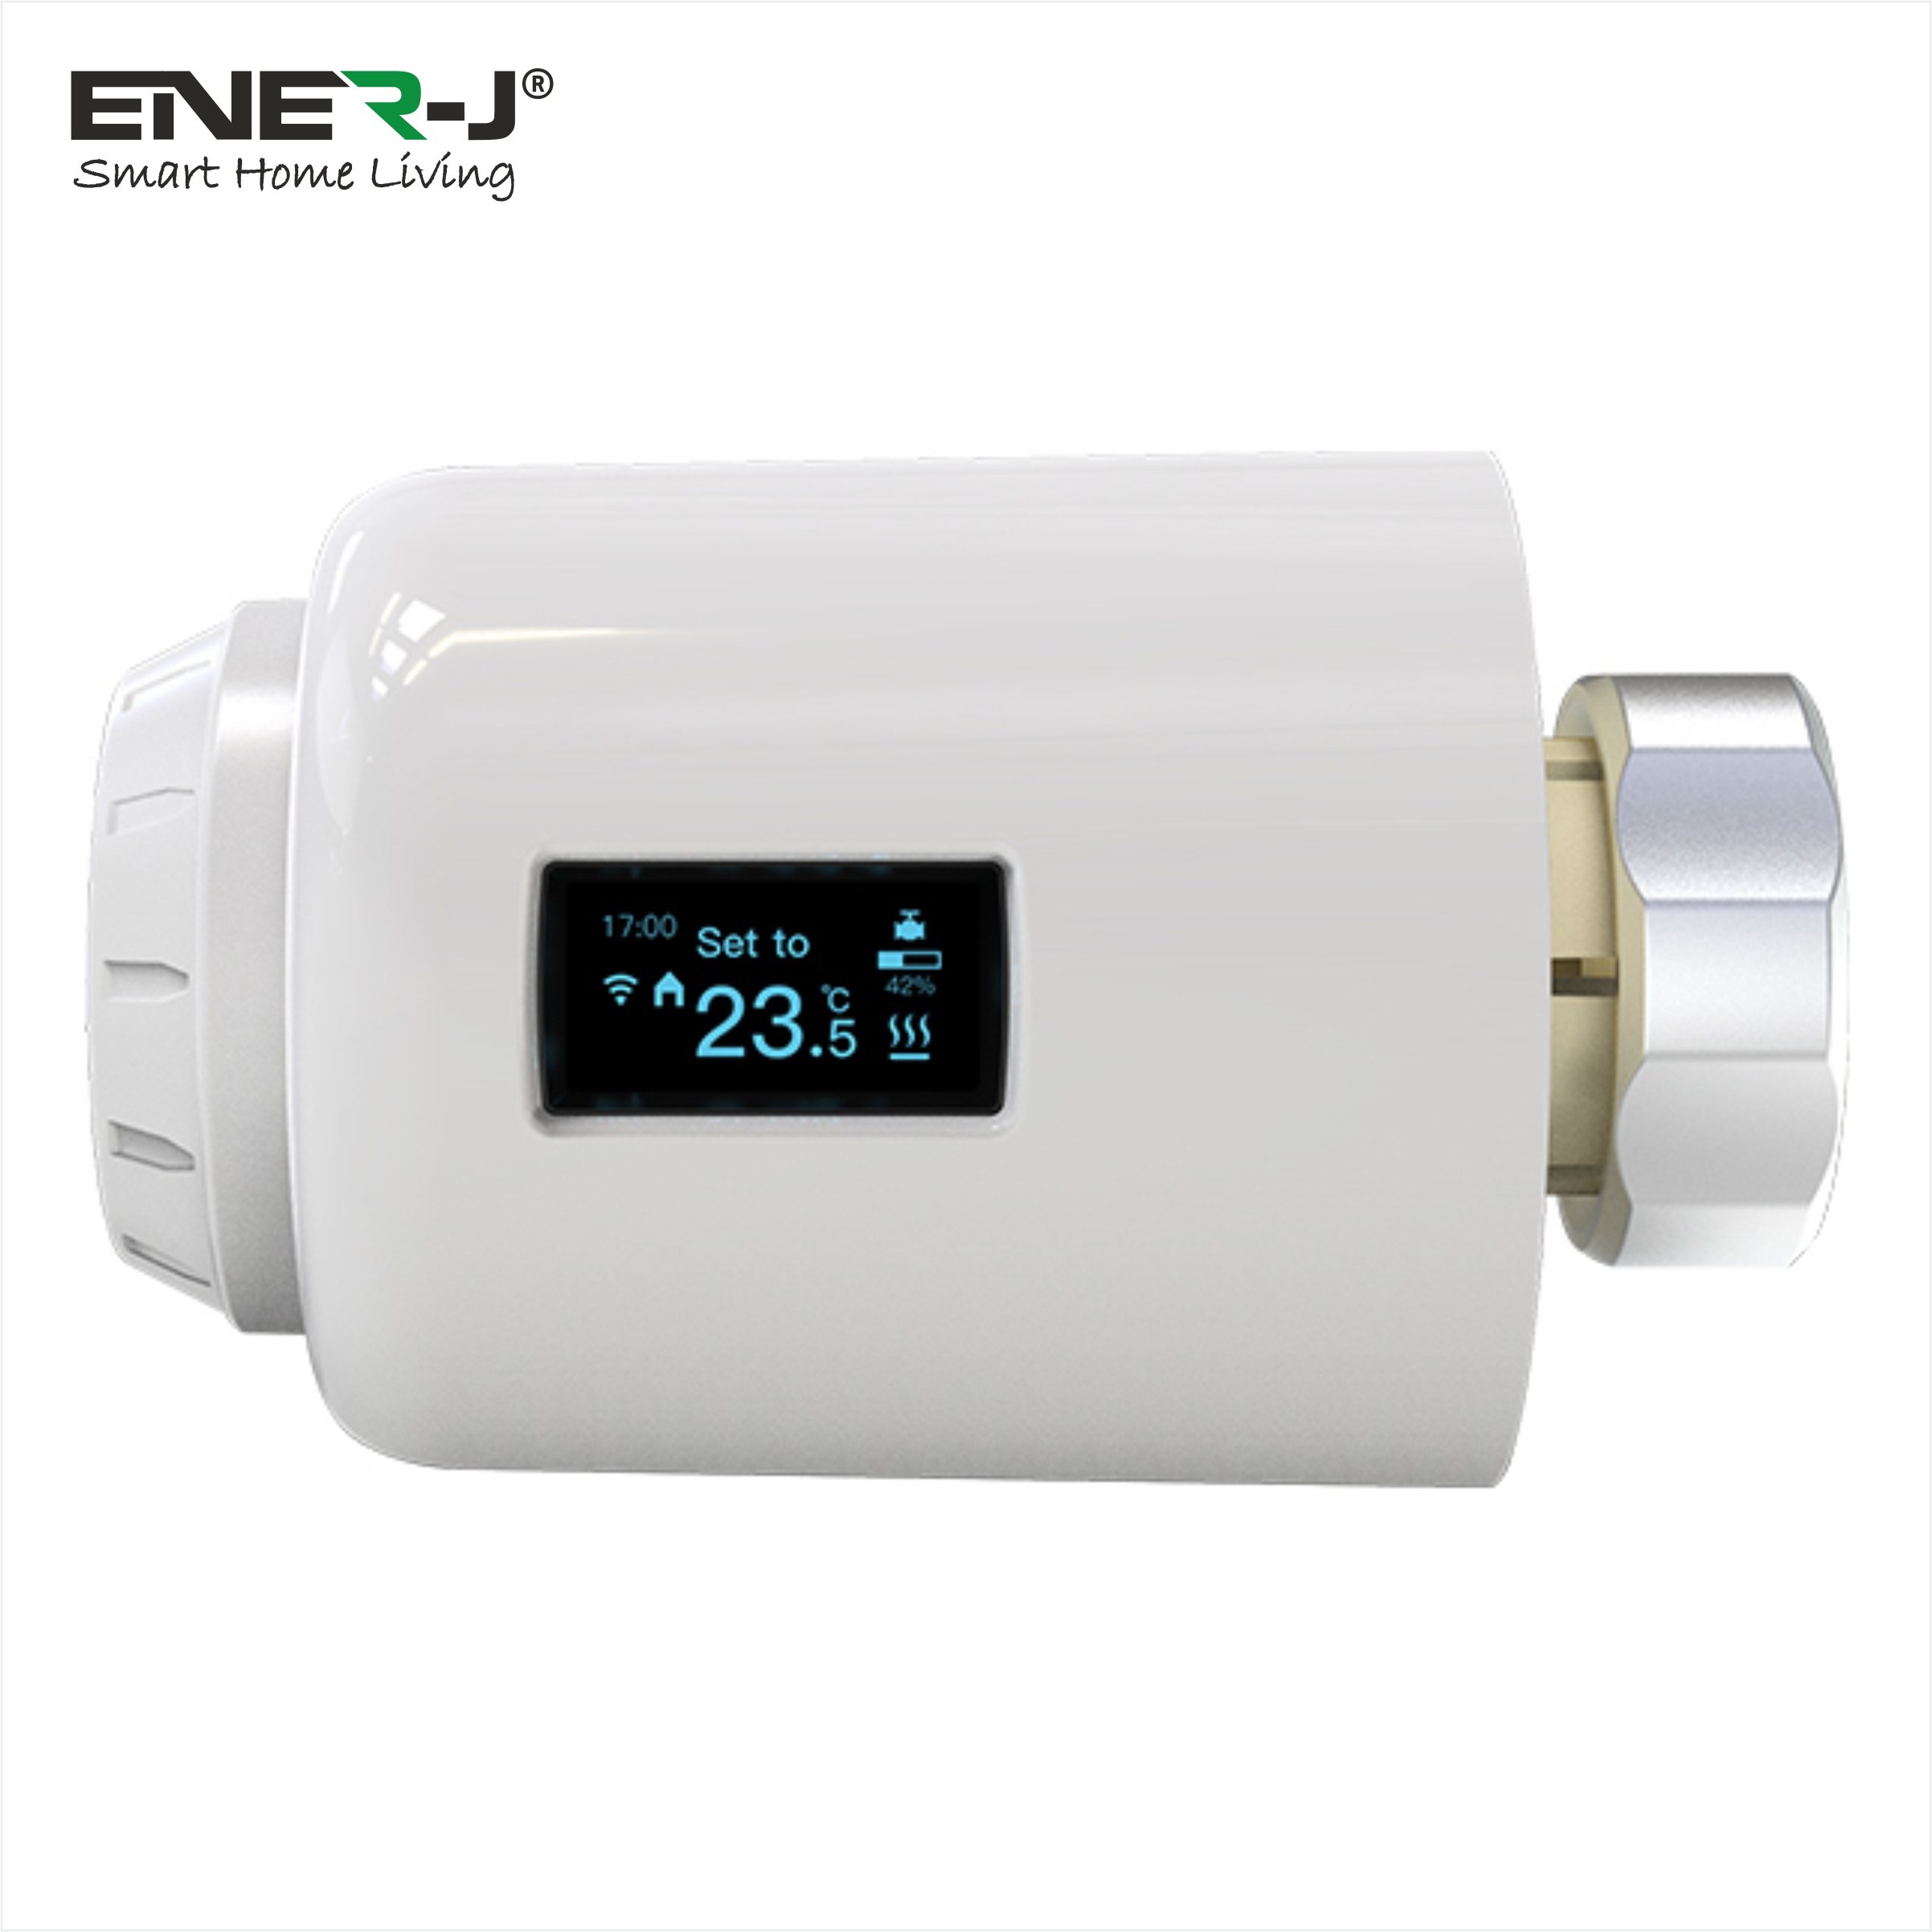
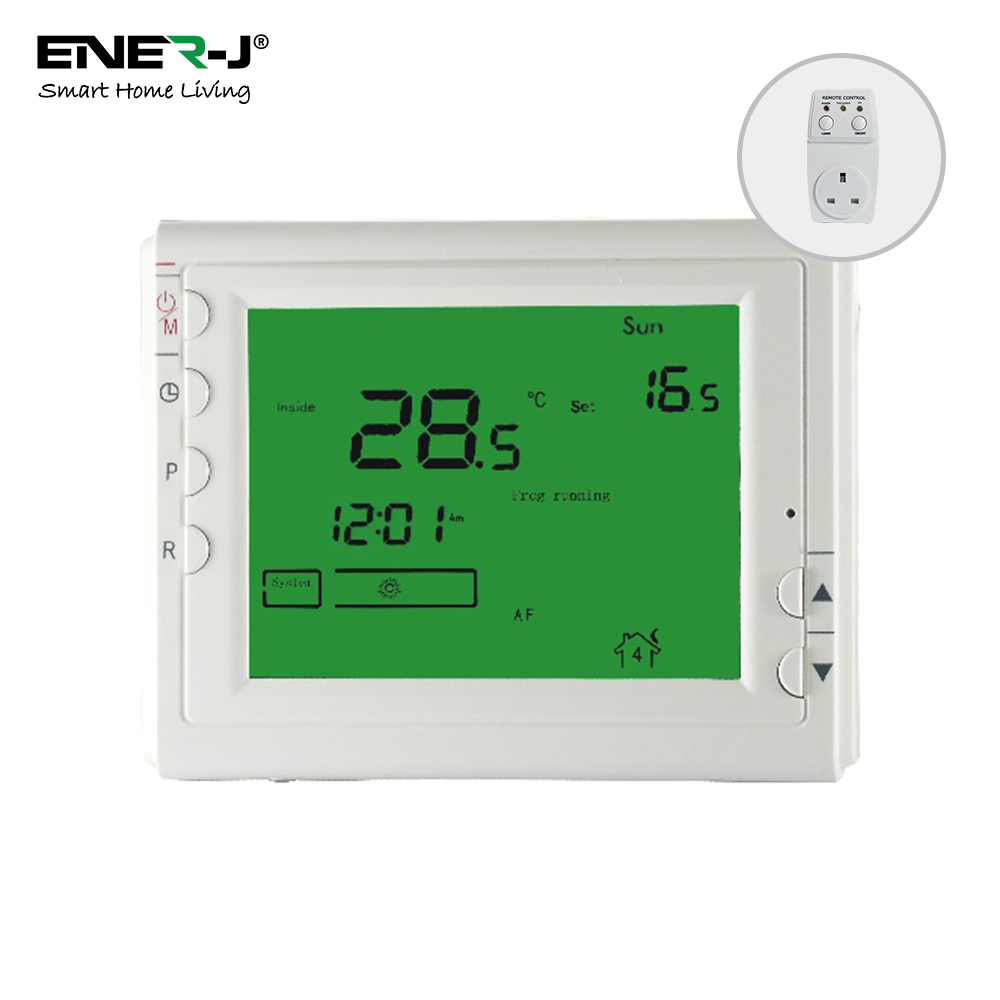
3600W Thermostat UK Plug with digital display
Works with ENER-J Infrared heating panels. Comes with Receiver as well as wireless digital display screen
- SKU - IH1015
- Description
- Specifications
Description
It can replace most common residential thermostat and is designed to be used with our Infrared heating panels.
Unlike ordinary single unit design thermostat, this unit is a new type of thermostat separating the thermostat function into two units. Receiver plug and Control Centre. The Receiver serves for wiring connections and heat on/off control. The Control Centre serves as user interface and temperature sensing/control. User can put the control Centre nearby and can read/control the temperature of really the living area while put the Receiver besides the heating system.
 SPECIFICATION
-
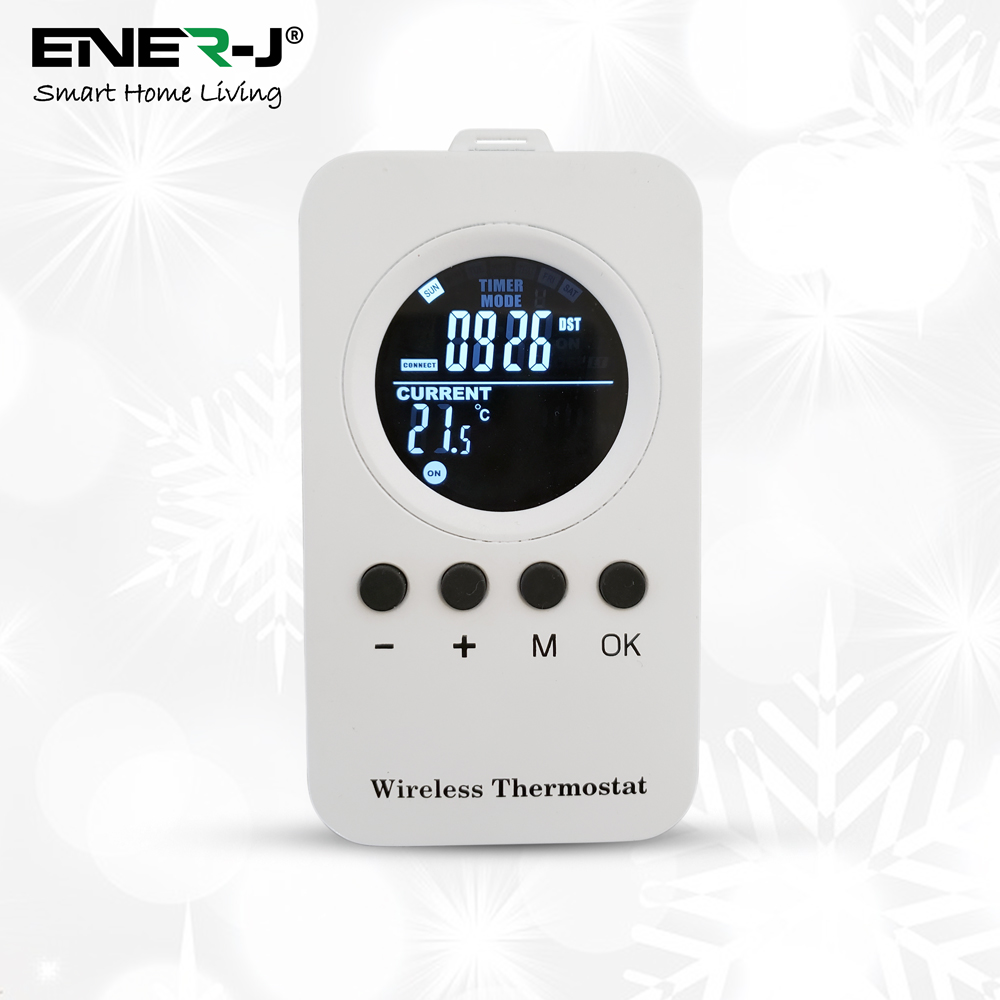
- Power source ……………………….Control Centre 2 AA batteries
Receiver 100-240VAC 50/60HZ
-
- Frequency band………………….….868MHZ?FSK?
- Relay contact……………………….……10A/250VAC
- Room temperature setting range………5?-35??41?-95??
- Accuracy…………………………………..1?or0.5?
- Dimensions……………………………Control Centre ?115mm*90mm*28mm
Receiver?126*67*46.5mm
 FEATURE
- Can be placed anywhere in the home to detect and control the temperature of an area of the user’s choice. Not limited by power control wiring locations.
- Link with the Receiver via RF. Control distance 100M open site.
- Large LCD display
- The screen displays the set temperature and the room temperature also time simultaneously
- Permanent user setting and program setting retention during power loss
- Optional temperature display of Celsius or Fahrenheit scale
- Both Vacation mode and hold duration mode available for comfort and energy saving
- Optional programming Period: 7 individual day or Separate 5-day (weekday) and 1-day/1-day (Saturday/Sunday) programming with 4 or 6 separate time/temperature periods per day.
- Display temperature recalibrates
- Low battery indication
- Anti-freezing protection
- Pump protection available
-
Specifications
Receiver install
|
||||||||||||||||||||||||||||||||||||||||||||||||||||||||||||||||||||||||||||||||||||||||||||||||||||||||||||||||||||||


 |
|||
|
|||

|
 time to get up
 time to go out in the morning
  time to come back in the morning
  time to go out in the afternoon
 time to return in the afternoon
  time to go to bed Low battery indicator
 System in Anti-freezing mode;
  System in heating mode;
  Manual temperature overide operation;
 Indicates a malfunction with the system;.
  Program setting mode
 Vacation mode indication
 Hold temperature indication
 SWITCH AND LED DESCRIPTION OF RECEIVER

Plug function check: In running state, if the plug didn’t receive the signal from the wireless transmitter more than 11 minutes, first close output; if the plug didn’t receive signal for one hour, the plug will open load for 10 minutes; if the plug still didn’t receive signal, then every pass 2 hours, the plug will open load for 10minutes; if after 24 hours, the plug still didn’t receive signal, the yellow LED will flash alarm, remind the user there maybe something wrong with the thermostat. If there is a signal contact, the yellow LED stop flashing, and the thermostat continues to run normally.
Plug forced output function: When the equipment need to forced output, press ON/OFF button of the plug , the green LED light , all output will not be controlled by the wireless transmitter; Press the ON/OFF button again, can cancel the forced output function.
 |
Code Match between the transmitter and receiver
1. Power on the plug to 230VAC, then long press the LEARN button for more than 3 seconds, the yellow LED will light, the plug has entered into code match state.
2. Long press the “R” button of the wireless transmitter for more than 3 seconds, if the code value “01” flash 3 times on the LCD of the transmitter, and simultaneously the yellow LED of plug flash 6 times. That means the plug and transmitter had coded match successfully.
Note: all thermostat had been coded match in factory, if you change the transmitter or receiver, you need to code match again
 OPERATION
- Configuration Menu
The configuration menu allows you to set certain thermostat operating characteristics to your system or personal requirements. Shortly press button ? to make sure the thermostat is in anti-freeze mode. Hold button ? for 3 seconds to enter the configuration menu. The display will show the first item in the configuration menu. Press button ? to shift to the next menu item. Use ? or ?to select. To exit the menu , press button ? revert to the anti-freeze mode . Press button ? revert to the program operation. If no buttons are pressed within 20 second the thermostat will exit the menu. To revert to factory default setting , push ? or ? button in a same time for 3 seconds. Display will show “DEF” blinking 3 times and return to Menu item 1 indicates all the configuration setting has reverted to factory default setting.
|
Step |
Press buttons |
Displayed?factory default? |
Press? or ?to select |
Descriptions |
|
1 |
? |
01 (0) |
-3 --- +3 |
Select temperature display adjustment higher or lower |
|
2 |
? |
02 ?35?? |
18?(64?)—35?(95?) |
Select maximum setting temperature limitation. |
|
3 |
? |
03 ?5?? |
5?(41?)—20?(68?) |
Select minimum setting temperature limitation. |
|
4 |
? |
04 ??? |
?/? |
Select temperature display to? or ? |
|
5 |
? |
05 ?FA? |
FA/SL |
Select fast heating or slow heating |
|
6 |
? |
06 ?OO? |
PP/OO |
Select pump protection PP, Cancel pump protection OO |
|
7 |
? |
07 ?24? |
12 or 24 |
Selection of time scale |
|
8 |
? |
08 (7) |
0/3/7 |
Programming day in one week option |
|
9 |
? |
09 ?P6? |
P4/P6 |
Programming period per day option |
|
10 |
? |
10?5? |
0/5/10 |
0?no backlight?5?backlight maintain 5 sec?10?backlight maintain 10 sec |
|
11 |
Press button ? revert to the program operation |
|||
- Select temperature recalibrates Adjustment 3 LO to 3 HI –
You can adjust the room temperature display up to 3 higher or lower. Your thermostat was accurately calibrated at the factory but you have the option to change the display temperature to match your previous thermostat. The current or adjusted room temperature will be displayed on the right side of the display.
- Select maximum temperature set point
This feature provides a maximum set point temperature f. The default setting is 35? (95?), It can be changed between 18? (64?) to 35? (95?).
- Select minimum temperature set point.
This feature provides a minimum set point temperature. The default setting is 5? (41?), It can be changed between 5? (41?) to 20? (68?).
- Select ? or ? readout.
Changes the display readout to Centigrade or Fahrenheit as required.
- Select fast heating or slow heating
Select FA to start heating immediately when the set point is 1? above the room temperature.
Select SL to start heating only when the set point is 3 ? above the room temperature.
- Select pump protection mode
For hot water heating installation, it is recommended to activate the pump at least 15 second every 24 hours in order to avoid any seizing. Select PP will activate pump protection mode. Select OO will cancel the function, it shows heating out normally. When thermostat activating the pump, 15 in the display will blink..,Heating output will be automatic operated as your setting.
7) Time display
To select 12 hours or 24hours display.
8) There are 2 options for how to program the day in one week.
7: You can program in 7 individual days. Factory default is 7.
3: You can program in 5 weekday and 1Saturday and 1Sunday.
0?You can set up not programming model
- Select separate time/temperature periods per day
P4 indicate 4 period programming per day; P6 means 6 period programming per day.
- Selection Backlight mode
0?no backlight?5?backlight maintain 5 sec?10?backlight maintain 10 sec
- Manual Operation
- On/Anti-freezing mode
You can press power button ? to activate the anti-freezing mode. The unit only displays Clock time, Weekday and Room temperature.The default set temperature for anti-freezing mode is 5?. During anti-freezing mode, if room temperature is below 5?, the unit will activate the heating system till room temperature reach to 9?. For hot water installations, if PP had been selected (See Configuration menu item 6), the unit will activate the pump at least 15 seconds every 24 hours in order to avoid any seizing. Press power button ? again will terminate the anti-freezing mode and return to normal operation mode.
-
 Program operation and Hold temperature operation
 Momentarily press ? shift between program operation and hold temperature operation. shows when thermostat is in program operation. Thermostat controls the heating system by presetting program. See Planning your program section. shows when thermostat is in hold temperature operation. The thermostat will hold the room temperature at the selected setting.
-
 Temperature override
During program operation, Press ? or ? until the temperature you want is displayed. shows in temperature override. The thermostat will override the current programming and keep the room temperature at the selected temperature until the next program period begins. Then the thermostat will automatically revert to the program.
-
 Vacation Temperature hold
Continue pressing button ? over 3 seconds until display will show indicates you have now entered into vacation hold? Use time key ? or ? to select the number of the days (from 1 to 99 days) during your vacation.?you can use ? or ?to adjust the temperature during your holiday. Push button ? to revert to program operation.?To the end of vacation time, it will automatically return to the program is running. In the vacation mode, Push button ? to revert to program operation.Vacation factory set temperature is 10 ?.
-
- Reset operation
If the display is abnormal, press the Reset button by using a fine probe such as a straightened paper clip to gently push the Rest button. This will reset the thermostat.
- Set current day and time
- Press ? button. The display will show the hour flashing.
- Press and hold either ? or ? until you reach the correct hour and AM or PM designation.
(AM begins at night, PM begins at noon)
-
- Press ? button once again. The display will only show minutes flashing
- Press and hold either ? or ? until you reach the correct minutes
- Press ? button once again. The display will show the day of the week flashing.
- Press ? or ? until you reach the correct day of the week
Press button ? once. The display will show the correct day of the week and the time. If no keys are pressed within 20 seconds, the thermostat will revert to program operation.
4? Planning your program
Look at the factory preprogrammed times and temperatures shown in the sample schedule. If this program will suit your needs, simply press the ? button to begin running the factory preset program.
If you want to change the preprogrammed time and temperature, follow these steps.
Determine the times period and temperature for your program. You must program four periods for each day. You can choose heating temperature and start time independently. (for example, you may select 5:00 AM and 70? as the weekday 1st period heating start time and temperature and also choose 7:00 AM and 76? and the weekday 1st period cooling start time and temperature)
Use the table to plan your program time periods and the temperatures you want during each period. Fill in the complete table to have a record of your program
Heating Schedule Plan (Factory default program setting)
|
|
door |
home |
door |
Back home |
|
||||||
|
6:00 |
21°? |
8:00 |
16.5? |
12:00 |
21? |
14:00 |
16.5? |
18:00 |
21°? |
22:00 |
16.5? |
 Wake up
 Out
Out  Back
Back 
 Out
Out  Sleep
Sleep
Enter Heating Program
1). Press ? once. 1 (indicating Monday program) will appear in the display. Also be displayed are the currently programmed start times for the 1st heating period and the currently programmed temperature (flashing), icon indicates 1st program period (Get up) setting?If the display shows 1 2 3 4 5, indicating that the 5-day program will be modified, you have a 5+1+1 day model. (See configuration menu item 8).
2). Press ? or ? to change the displayed temperature to your selected temperature for the 1st heating program period.
 3). Press ? once (the programmed time will flash). Press ? or ? until your selected time appears. The time will change in 15-minute increments. When your selected time is displayed, press TIME again to return to the change temperature mode.?
4). Press ? once, icon 2nd program period?Go out?display?the currently programmed start time and set point temperature for the 2nd heating program period will appear
5). Repeat steps 3 and 4 to select the start time and heating temperature for the 2nd heating program period.
6). Repeat steps 3 through 5 for the 3rd;4th;5th;6th heating program periods. If 4 period per day selected in the configuration menu item 9, only 4 period can be programmed each day.
7). Press ? once. “2” (indicating Tuesday program) will appear in the display, along with the start time for the 1st heating period and the currently programmed temperature. If the display shows 6, indicating that Saturday program will be modified in 5+1+1 day model.
8). Repeat steps 3 through 6 to complete Tuesday (7 day model) or Saturday (5+1+1 day model) heating programming.
9). Continue entering each day’s programming until all heating periods time and temperatures have been entered.
10). When you have completed entering your heating program, press ?.
7days program refer to above .
REVERT TO FACTORY DEFAULT PROGRAM SETTING
Press


.jpg)